花了一个下午的时间修改了一下项目结构,简单记录一下
上次介绍了一下参与的一个横向中的一个模块,最近花了一点时间梳理了一下结构,简单记录一下。功能并没有增加,还是比较简单的。
简介
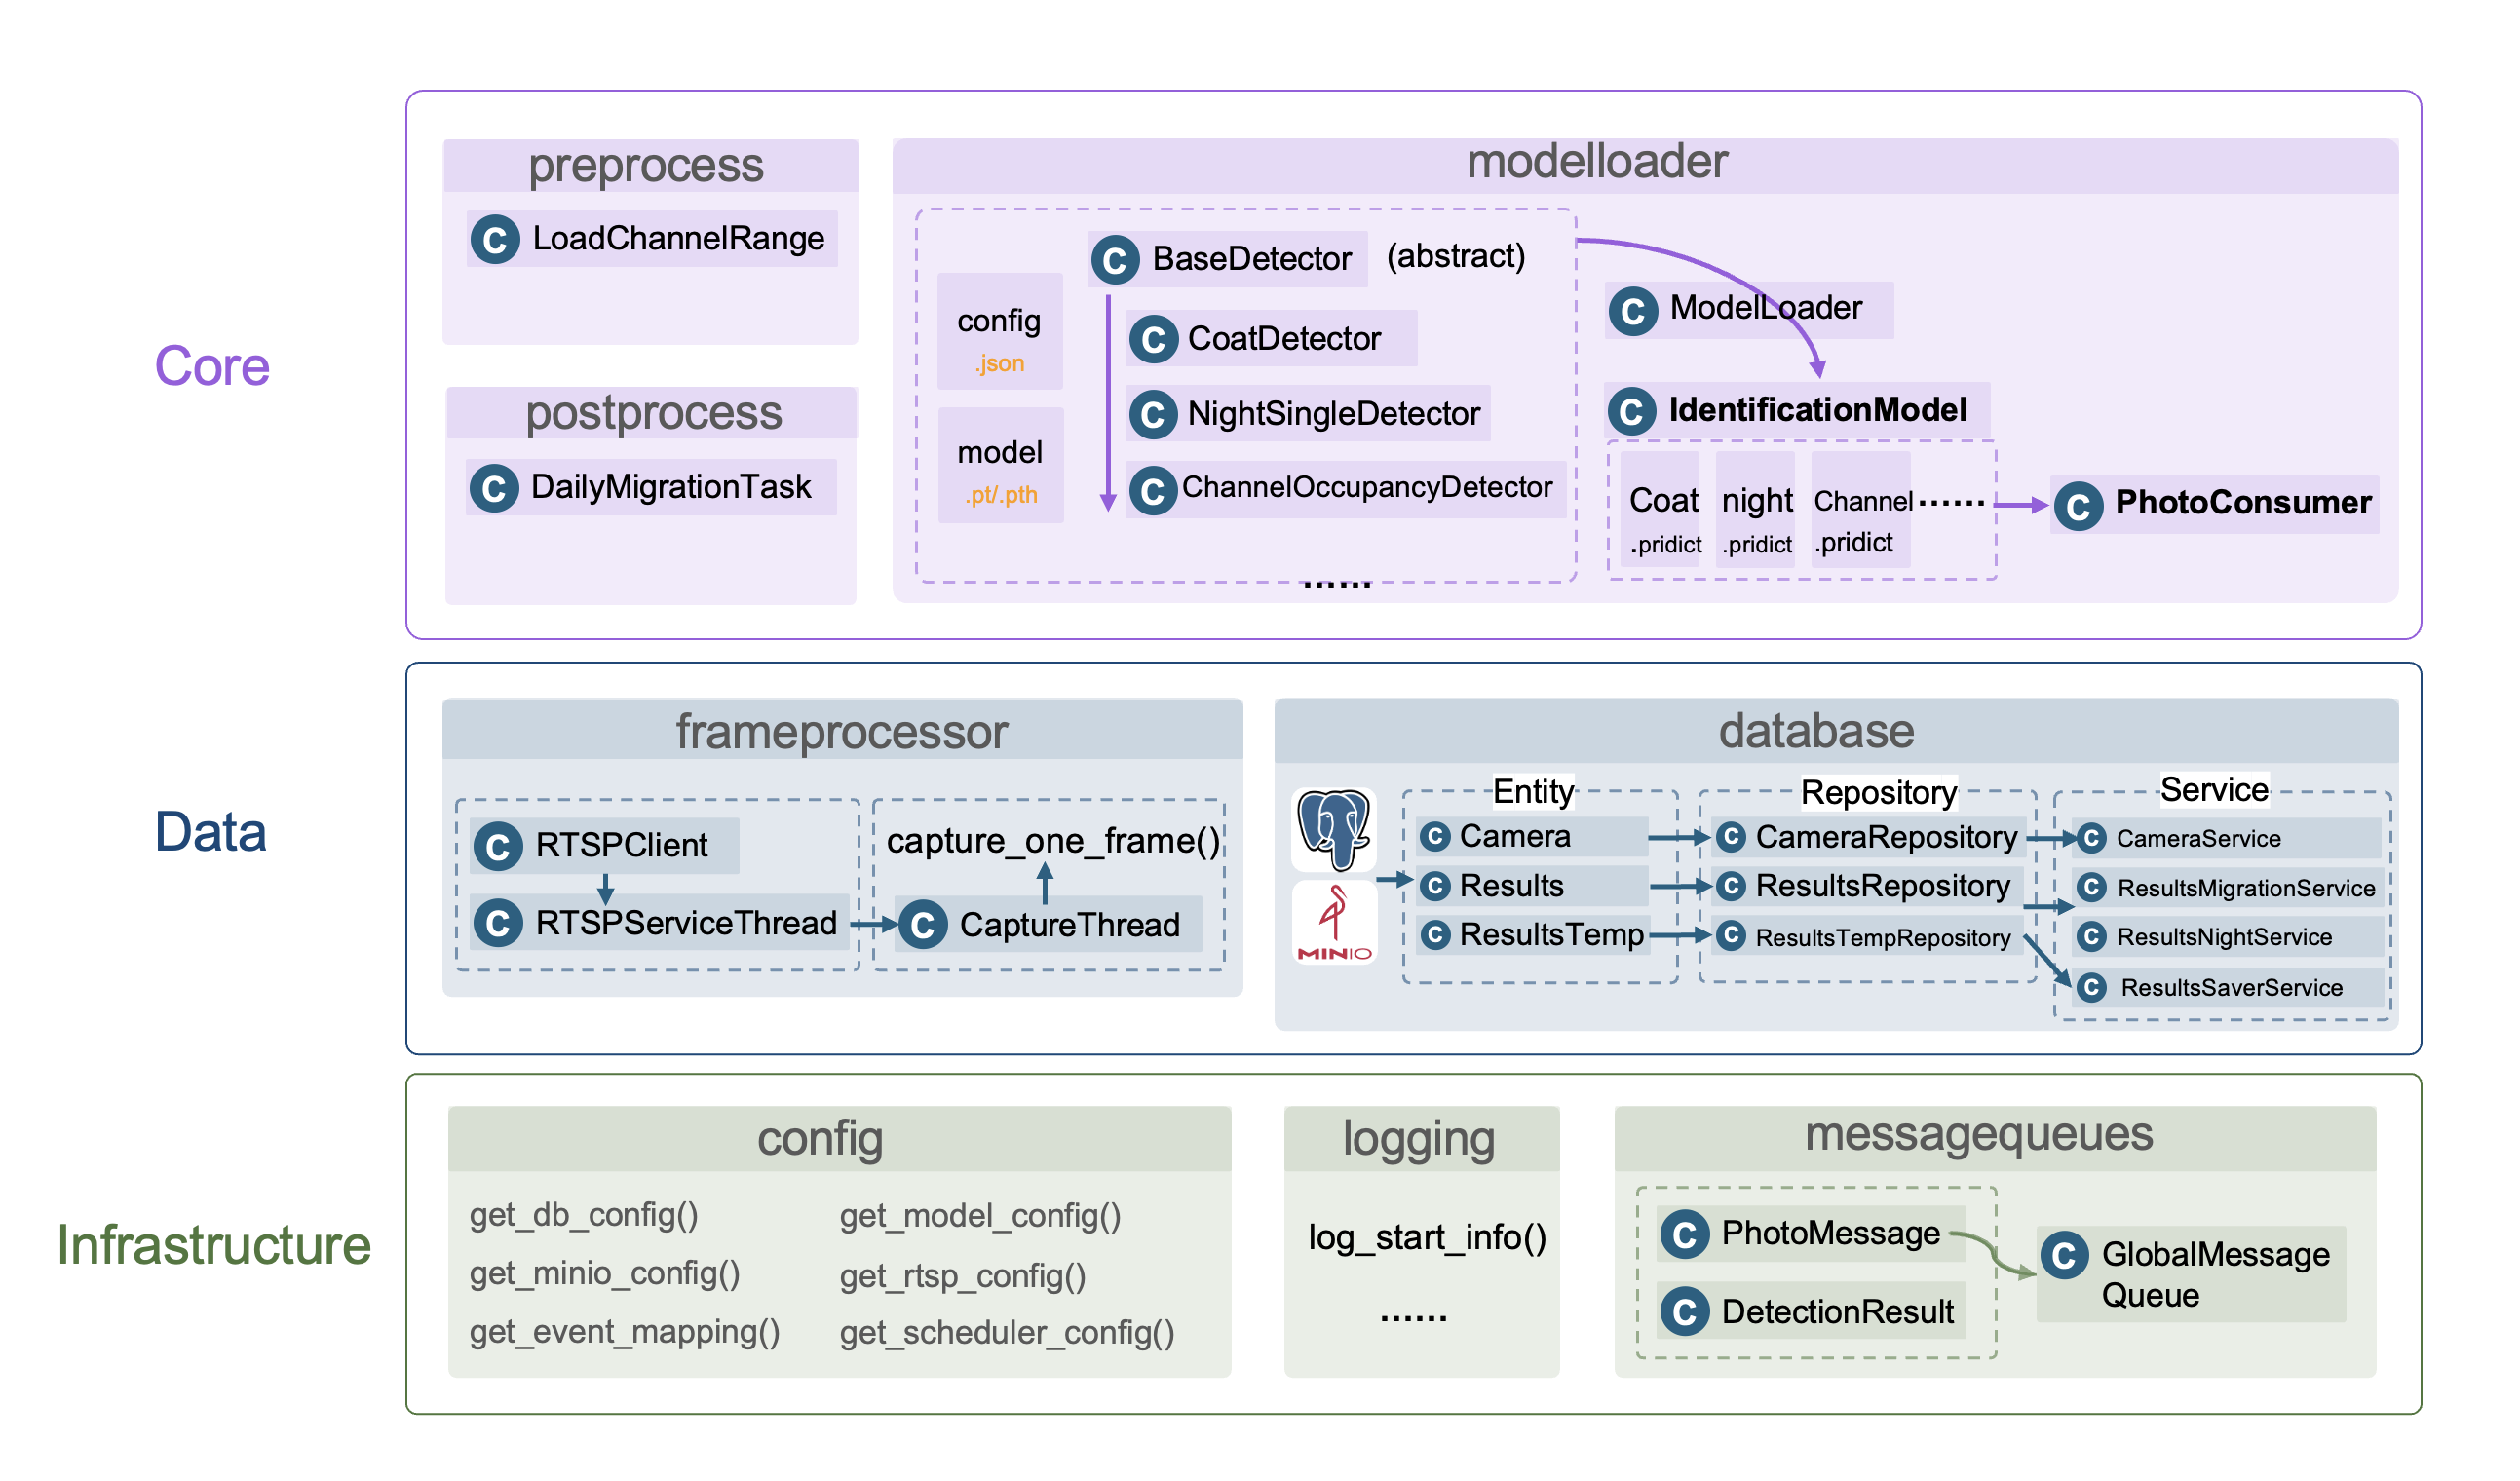
系统由三个功能层组成:
- infra:基础功能层,包括config(配置加载)、logging(日志打印)、messagequeues(消息队列)
- data:负责数据部分功能,主要包括frameprocessor(视频流相关)、database(minio与postgresql数据库的增删改查接口)。连接的psql数据库和minio由docker实现。
- core:核心业务层,包括prepocess(负责加载识别模型加载前需要预加载的数据)、modelloader(加载识别模型,定义识别方法(pridict)、输出识别结果、postprocess(后处理,主要为每日数据迁移任务))
1. infra
1.1 config
读取根目录下的config.yaml文件,提供加载各类配置的接口,config文件如下:
1
2
3
4
5
6
7
8
9
10
11
12
13
14
15
16
17
18
19
20
21
22
23
24
25
26
27
28
29
30
31
32
33
34
35
36
37
38
39
40
41
42
43
44
|
db:
host: "localhost"
port: 5434
user: "postgres"
password: "postgres"
database: "labcamera"
minio:
endpoint: "localhost:9000"
access_key: "minioadmin"
secret_key: "minioadmin"
bucket: "detection-results"
event:
event_dict:
coat: 1
nightsingle: 2
channeloccupancy: 3
model:
coatdetecter: "coatdetecter.json"
nightsingledetecter: "nightsingledetecter.json"
channeloccupancydetecter: "channeloccupancydetecter.json"
rtsp:
server_ip: "***.***.***.***"
username: "***"
password: "***"
channel_num: 256
stream_type: 1
scheduler:
"main_program":
"start": "05:00"
"end": "03:00"
"summary_program":
"start": "03:00"
"end": "05:00"
|
1.2 logging
日志模块
1.3 messagequeues
消息队列模块,首先在PhotoMessage.py中定义了两个类:
1
2
3
4
5
6
7
8
9
10
11
12
13
14
15
16
17
18
19
20
| class PhotoMessage:
"""
表示视频流处理管线中的单帧消息对象。
用于封装单帧图像及其关联的上下文信息。
属性说明:
photo_id (str): 帧的唯一标识符(默认使用 UUID 自动生成)。
camera_id (str): 摄像头设备编号或标识。
room_id (str): 拍摄帧所在的物理位置或房间标识。
photo_path (Path): 帧图像文件的路径或内存引用。
timestamp (datetime): 帧捕获的时间戳(若未提供则自动生成)。
metadata (Dict[str, Any]): 附加的处理上下文信息。
"""
camera_id: str
room_id: str
photo_path: Path
task_id: int = 0
photo_id: str = field(default_factory=lambda: str(uuid.uuid4()))
timestamp: datetime = field(default_factory=datetime.now)
metadata: Dict[str, Any] = field(default_factory=dict)
|
1
2
3
4
5
6
7
8
9
10
11
12
13
14
15
16
17
18
19
20
21
22
23
24
25
26
| class DetectionResult:
"""
表示单帧图像检测(识别)结果的数据结构。
属性说明:
ifwarning (bool): 是否触发告警(True 表示异常或警告)。
image (Optional[Image.Image]): 检测后的处理图像或标注结果。
description (str): 检测结果的文本描述信息。
timestamp (Optional[datetime]): 检测结果生成的时间戳。
task_id (int): 关联的任务标识符。
room_id (str): 检测帧所在的物理房间标识。
camera_id (str): 对应的摄像头编号。
alarm_category (str): 告警类型或类别(默认值为 'unknow')。
"""
def __init__(self, ifwarning: bool = False, image: Optional[Image.Image] = None,
description: str = "", timestamp: Optional[datetime] = None,
task_id: int = 0,
room_id: str = "", camera_id: str = "", alarm_category: str = "unknow"):
ifwarning = ifwarning
self.image = image
self.description = description
self.timestamp = timestamp
self.room_id = room_id
self.camera_id = camera_id
self.alarm_category = alarm_category
self.task_id = task_id
|
并在MessageQueue.py中定义了一个全局消息队列GlobalMessageQueue(),用于存放PhotoMessage,并确保其线程安全。并实现:
put_message(self, msg: PhotoMessage) -> boolget_message(self) -> Optional[PhotoMessage]persist_messages(self, file_path: Path) -> intload_messages(self, file_path: Path) -> int- ……
等方法。
2.Data
2.1 frameprocessor
负责视频流处理。首先在rtsp_client.py中定义了实现:
- 登录视频服务器获取 Token
- 定时保活
- 注册播放通道
- 获取指定摄像头的 RTSP URL
- 登出释放 Token
功能的RTSPClient 类,并定义了其线程实现RTSPServiceThread(threading.Thread),该线程启动后运行逻辑为:
- 登录并注册播放通道
- 循环执行 keep_alive 保活
- 异常处理后自动登出
随后在get_rtsp.py定义了CaptureThread(threading.Thread)的摄像头抓帧线程,管理 RTSP 流保活和帧捕获。
1
2
3
4
5
6
7
8
9
10
11
12
13
14
15
16
17
18
19
20
21
22
| class CaptureThread(threading.Thread):
"""
摄像头抓帧线程,管理 RTSP 流保活和帧捕获。
Attributes:
rtsp_config (dict): RTSP 配置
rtsp_thread (RTSPServiceThread): RTSP 服务线程
db_conn: 数据库连接对象
running (bool): 线程运行状态
camera_list (List[Dict[str, Any]]): 当前任务摄像头列表
wait_rtsp (int): 两次摄像头抓帧间隔(秒)
round_rtsp (int): 每轮抓帧最小总间隔(秒)
"""
def __init__(self):
super().__init__(daemon=True)
self.rtsp_config = RTSP_CONFIG
self.rtsp_thread = RTSPServiceThread(RTSP_CONFIG)
self.db_conn = None
self.running = True
self.camera_list: List[Dict[str, Any]] = []
self.wait_rtsp = 1
self.round_rtsp = 600
|
线程主逻辑:
- 启动 RTSP 服务线程(自动保活)
- 连接数据库获取摄像头列表
- 循环抓取摄像头单帧图像并发送到消息队列
2.2 database
database模块基于分层式架构模式(entity、repository、service三层)
- entity:实体层,定义了数据库中各个表对应的实体类,如
Camera、Results、ResultsTemp。
- repository:数据访问层,负责与数据库进行交互,提供数据持久化和检索功能,如
CameraRepository、ResultsRepository、ResultsTempRepository。
- service:业务逻辑层,负责处理业务逻辑,如
CameraService、ResultsMigrationService、ResultsNightService、ResultsTempSaverService,这部分负责提供数据库部分的各个接口,给其他组件调用,实现解耦。
我们以数据暂存为例,其需求是每次检测完成后,暂存数据到t_results_temp表中,因此,我们需要先定义一个ResultsTemp的Entity:
1
2
3
4
5
6
7
8
9
10
11
12
| class ResultsEntity(Base):
__tablename__ = "t_results"
id = Column(Integer, primary_key=True, autoincrement=True)
task_id = Column(String(100))
event_id = Column(Integer)
description = Column(Text)
time1 = Column(TIMESTAMP)
time2 = Column(TIMESTAMP)
picture1 = Column(String(255))
picture2 = Column(String(255))
picture3 = Column(String(255))
|
随后,定义一层数据访问层ResultsTempRepository:
1
2
3
4
5
6
7
8
9
10
11
12
13
14
| from entity.ResultsTemp import ResultsTempEntity
class ResultsTempRepository:
def __init__(self, session: Session):
def insert(self, entity: ResultsTempEntity):
def find_all(self):
def find_by_task(self, task_id: str):
def query_by_event_and_date(self, event_ids, date_str):
def delete_batch(self, records):
|
最后,定义一个Service:ResultsTempSaverService 来提供服务接口:
1
2
3
4
5
6
| class DataSaverService:
"""Service 层:处理检测结果保存(数据库 + MinIO 上传)"""
def __init__(self):
def save_detection_result(self, result: DetectionResult):
|
那么,在其他组件中调用save_detection_result即可。
3. Core
3.1 preprocess
里面放一些预处理函数,比如从数据库下载通道范围。然后我们在detect.py中在启动识别线程前调用即可。比如说我在detect.py里面调用的:
1
2
3
| from core.preprocess import LoadChannelRange
LoadChannelRange.save()
|
3.2 modelloader
重点
modeller部分负责加载模型,并实现识别功能。
对于一个识别功能模块,首先,我们需要在modelloader/config中添加一个配置json文件,比如:
1
2
3
4
5
6
7
8
9
10
11
12
13
14
15
| {
"name": "coatdetecter",
"pipeline": [
{
"name": "yolo11s",
"type": "pt",
"weight_path": "core/modelloader/model/yolo11s.pt"
},
{
"name": "mobilenet_v2",
"type": "pth",
"weight_path": "core/modelloader/model/coat_classifier_final.pth"
}
]
}
|
并将其添加到根目录下的config.yaml文件中的 模型参数配置 部分。
并且按照"weight_path"的路径正确将权重模型存放在相应的路径。
随后,我们在在modelloader/functionmodel定义一个模型识别类,我在这个路径下的base_detector.py提供了一个抽象类:
1
2
3
4
5
6
7
8
9
10
11
12
13
14
15
16
17
18
19
20
21
22
23
24
25
26
27
28
29
30
31
32
33
34
35
36
37
38
39
40
41
| class BaseDetector:
"""
Detector 示例模板
子类必须实现 load 方法,返回 predict 函数:
predict(message: PhotoMessage, image_input: np.ndarray) -> Optional[DetectionResult]
predict 函数必须:
1. 接受 PhotoMessage 和 np.ndarray(BGR 图像)
2. 返回 DetectionResult 或 None
3. 对图像操作应使用 copy(),避免并行冲突
"""
@staticmethod
def load(model_pipeline: list, device):
"""
初始化模型,返回 predict 函数。
"""
def predict(message: PhotoMessage, image_input: np.ndarray) -> Optional[DetectionResult]:
"""
对输入图像执行检测,返回 DetectionResult 或 None。
"""
image = image_input.copy()
return None
return predict
|
基于这个抽象类的要求,实现一个具体的识别类,比如我在coat_detector.py中实现了一个CoatDetector(BaseDetector)类。
同时,在modelloader.py中,提供了一个工厂类ModelLoader,用于加载模型,如下:
1
2
3
4
5
6
7
8
9
10
11
12
13
14
15
16
17
18
19
20
21
22
23
24
25
26
27
28
29
30
31
32
| class ModelLoader:
"""
模型加载工厂类,统一根据模型名称返回预测函数。
"""
MODEL_MAP: Dict[str, Callable[[Any, torch.device], Any]] = {
"coatdetecter": CoatDetector.load,
"nightsingledetecter": NightSingleDetector.load,
"channeloccupancydetecter": ChannelOccupancyDetector.load
}
@staticmethod
def loader(model_name: str, model_pipeline: Any, device: torch.device) -> Callable:
"""
根据模型名称加载对应的检测模型,并返回预测函数。
Args:
model_name (str): 模型名称,如 "coatdetecter"。
model_pipeline (Any): 模型权重路径或配置列表。
device (torch.device): 模型运行设备。
Returns:
Callable: 用于执行预测的函数,输入为 image/message,输出 DetectionResult。
Raises:
ValueError: 如果模型名称不在支持列表中。
"""
try:
load_func = ModelLoader.MODEL_MAP[model_name]
except KeyError:
raise ValueError(f"Model '{model_name}' is not supported.")
return load_func(model_pipeline, device)
|
为了加载刚刚的模型,我们把模型名字和模型类.load函数加载在MODEL_MAP中
再同时,在modelloader.py中,还提供了一个IdentificationModel类,
1
2
3
4
5
6
| class IdentificationModel():
def __init__(self, config: Dict[str, Any]):
self.device = torch.device("cuda" if torch.cuda.is_available() else "cpu")
self.name = config["name"]
self.pipeline = config["pipeline"]
self.predict = self._loadmodel()
|
这个IdentificationModel类,调用了工厂类ModelLoader的loader方法,将模型加载到predict中,然后我们就可以直接调用实例化后的IdentificationModel类的predict方法进行识别了。这里其实逻辑比较混乱,读者完全可以将这两个类合并。
了解完这些后,我们最终定义一个消费者线程类,该类首先基于config文件,初始化一个IdentificationModel实例列表,然后对于messagequeue中的每个PhotoMessage,遍历调用每个IdentificationModel实例的pridict()方法进行识别,并调用data.service暴露的存储接口进行存储。
1
2
3
4
5
6
7
8
9
10
11
12
13
14
15
16
17
18
19
20
21
22
23
24
25
26
27
28
| class PhotoConsumer(threading.Thread):
def __init__(self, config_list: List[dict], poll_interval: float = 1, max_workers: int = 4):
"""
多线程消费者:从 global_mq 获取消息,读取图片,执行模型推理,并删除图片。
:param config_list: 一组 config 字典(每个配置一个模型)
:param poll_interval: 轮询间隔秒数
:param max_workers: 并发处理的最大线程数
"""
super().__init__(daemon=True)
self.poll_interval = poll_interval
self.running = True
self.db = DataSaver()
self.executor = ThreadPoolExecutor(max_workers=max_workers)
self.modellist = [IdentificationModel(config) for config in config_list]
for model in self.modellist:
logger.info(model)
def stop(self):
"""停止线程并关闭线程池"""
def run(self):
"""主线程循环获取消息并交由线程池处理"""
def process_message(self, message: PhotoMessage):
"""处理单条消息的识别与存储"""
|
最后定义一个start_photo_consumer_concurrent()函数用于启动模型消费者,有detect.py调用,其中,
1
| consumer = PhotoConsumer(config_list, max_workers=3)
|
其中,max_workers为启用的消费者线程数
3.3 postprocess
里面放一天的识别结束后的操作,比如说将识别结果数据梳理后从t_results_temp表迁移到t_results表,并删除t_results_temp表中的数据。preprocess和postprocess里面的操作大多数被封装为了data.database.service里面的服务接口,只要调用就行了。值得关注的是,preprocess在detect.py中被调用,而postprocess在main.py中被调用。
1
2
3
4
5
6
7
8
9
10
11
12
13
14
15
16
17
18
| from core.postprocess.migration_runner import DailyMigrationTask
summary_start = str_to_time(config["summary_program"]["start"])
summary_end = str_to_time(config["summary_program"]["end"])
if in_time_range(summary_start, summary_end, now):
if not started_summary:
print("[INFO] 启动归纳程序")
task = DailyMigrationTask()
task.run()
started_summary = True
else:
if started_summary and summary_proc:
print("[INFO] 关闭归纳程序")
started_summary = False
time.sleep(60)
|
架构
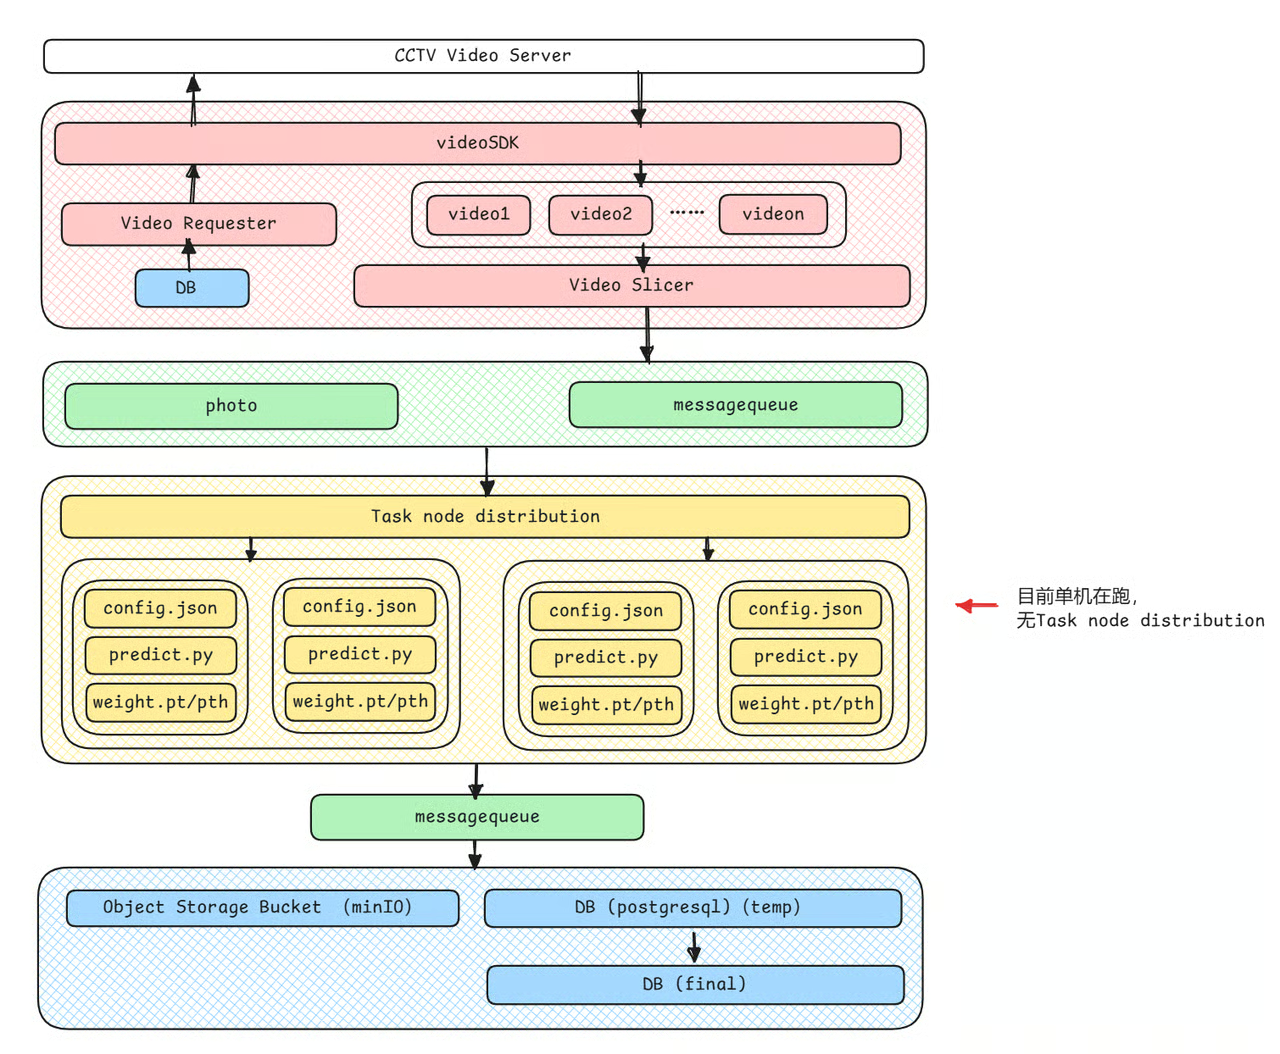
现在没有设计多GPU,也暂时没有必要。